How To: Sew A Whip Stitch

Ah, the humble Whip stitch. It is super quick, super easy, and very versatile! Though many of us may already be familiar with the whip stitch, did you know this simple stitch has many variations and a wide variety of uses? From hemming, seaming, to decoration- It is used in crafts of all kinds including sewing, knitting/crochet, even leatherwork- it is one of the most recognizable for a reason!
Today, in this next installment of the how-to hand stitch series, we are showing you step by step how to sew a whip stitch and a few of the most useful varieties and applications. Including diagonal whip stitch, straight whip stitch, and using the whip stitch for seaming.
The whip stitch is a great option for a super quick hem but I love to use this stitch to temporarily keep things in place. I always whip stitch my collar stands and waistbands down before topstitching or stitching in the ditch, this ensures nothing shifts during sewing and I don’t have to navigate around bumpy pins! Then I simply remove the whip stitching and everything is caught, the seam is consistent and even, my garment has a professional-looking finish.
I also love to use the whipstitch when sewing tiny felt creatures as you may have seen in many of our Christmas ornament tutorials. Like this can of sardines.
Now that we know where we can apply this stitch, follow below for a step-by-step guide on how to sew the diagonal whip stitch, the straight whip stitch, and how to use the whip stitch for seaming.
A few notes before we get started:
- In the photographs below we are working from right to left, though I find it easier to lay out your piece so the hem or seam is in line with your body and you can work the stitch up and away from you.
- We are including measurements in these instructions but these are just a suggestion and what we used for our sample. Different projects require different measurements so use whatever measurements suit your project best.
- For even and consistent stitches the entry and exit points of the needle are crucial. Using a seam gauge or marking your stitch points with chalk or a removable marking tool can help ensure your stitches are all the same distance and length creating a more professional finish.
- Thread tension is a huge factor with this stitch - too tight of stitches can create gathers or puckering and too loose will be less secure and messy. However, you can utilize different thread tensions depending on your project; for example, you may need to use a tighter thread tension to ease or gather a larger piece into a smaller piece.
Alright let's get started with the diagonal whipstitch!

For this example of the diagonal whipstitch we are working on the inside of the garment on a double fold hem but these same principles are used for any application.

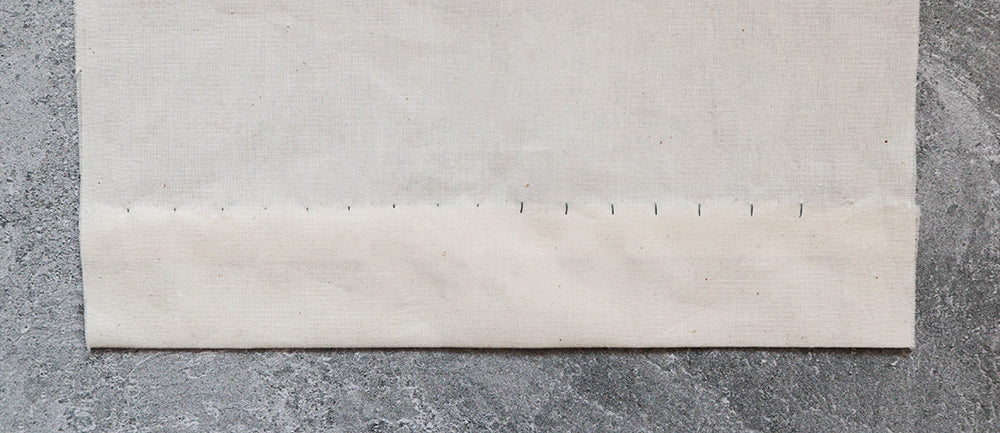
Grab your needle and thread and hide the knot behind the folded edge by bringing the needle through the back of the hem to the front of the hem ¼” down from the free folded edge. This is #1 on the diagram above and we are now ready to begin the stitch!

Bring the needle up and over to the left about 1/2" at a diagonal and just above the free folded edge of the hem. If you are sewing a hem that you wish to be invisible from the right side of the garment- grab 1-3 threads with the point of your needle. If you don’t mind the stitch being visible on the other side or this is a temporary stitch, just put your needle in and move onto the next step. This is #2 in the diagram above.

Behind the fold of the hem, keep the needle perfectly perpendicular to the hem. Moving in a straight line from your entry point, bring the needle down and out through the front of the hem ¼” away from the free folded edge so the exit point is level with the previous one. You are now back at #1 and can begin again.

As said in the notes, using a seam gauge or marking your entry and exit points help keep stitches even, level, and consistent. It takes a little more time than just eyeballing it but the end result is definitely worth it. However, If your whip stitch is just a temporary stitch you will be taking out later, you don't need to worry about measuring or marking.

Repeat these steps until you reach the end and secure with a knot.
This is what the outside of the garment will look like when finished. As you can see on the left side where only a few threads were picked up, we have created a nearly invisible hem. On the right side, the length of the stitch from point #2 to #1 is visible.
Next we will show you how to create the straight whip stitch, it is the very same technique, the only difference is the direction you move your needle.

Begin In the same way as the diagonal whip by burying your knot behind the hem and bringing your needle and thread through to the front of the hem ¼” down from the free folded edge. You are now at #1 in the diagram above and can start the stitch!

Moving in a straight line from exit point #1, bring your needle just above the fold of the hem. Again, if you wish for an invisible hem from the right side of the garment grab 1-3 threads with the point of your needle. Otherwise, just put your needle in and continue to the next step.

Behind the folded hem, move your needle at a diagonal over 3/8” and bring your needle and thread through to the front of the hem ¼” down from the free folded edge so the exit point is level with the previous one. You are now back at #1 and can begin again.


Again, if the whipstitch is staying, taking time to make sure your stitches are evenly spaced and level will make all the difference with the finished look.

Repeat the steps until you reach the end and secure with a knot.

This is what the straight whip stitch will look like from the outside of the garment- invisible on the left (where we grabbed a few threads) and visible on the right.
Now that we know the building blocks of the whip stitch, following is how to apply these same techniques to seam two pieces of fabric together. What is unique about using the whip stitch to seam is when the pieces are opened up after sewing they can lay flat.
You can use either diagonal or straight whip stitch as shown above to seam. The principles of how-to are the same, the only difference here is instead of working flat from one side to another, we are working around the raw edges of two pieces of fabric.

Working with the raw edges together and facing up towards you, hide the knot and bring the needle and thread out on the left side (left-handed sewers it will be the right side) ¼” down from the raw edge ( as stated in the notes, these measurements are just a suggestions, use whatever measurements work best for your project). Bring the needle over the raw edges to the right hand side moving either straight across or at a diagonal 3/8” away depending on which method you choose. Insert your need ¼” from the raw edge. Now, depending on which method you use will determine the direction you move your needle. If working a straight whip stitch- move your needle at a diagonal through the inside to your next exit point 3/8” away and ¼” down. if using a diagonal whip stitch, move your needle straight across to exit ¼” down from the raw edge.

Repeat these steps until you reach the end and secure with a knot.

This is what it looks like when you open the pieces and lay them flat no matter which method you chose. If you did the diagonal whip, the diagonal stitches will be on the right side and if you did the straight whip, the straight stitches will be on the right side. Be mindful of thread tension here - If your thread tension is too tight it will pucker and not lay flat but if your tension is too loose there will be a gap between your two pieces.
That’s all for today! Hopefully you discovered something new about the whip stitch or were able to get reacquainted with it. Keep an eye out for upcoming hand stitch tutorials and feel free to check out our other posts in this series showcasing the catch stitch and slip stitch.
Happy hand sewing!